lördag 3 december 2016

Tudor steampunk gown

After seeing BBC's  TV series Wolf Hall set in Tudor (16th century) England, I suddenly found myself needing an 16th century upper class gown. As I did not expect to have much use for historically correct 16th century men's clothing, I got the idea to combine it with pants and shirt with a 19th century feeling, and call it steampunk. I also wanted to push the boundaries of steampunk a bit - how much can one deviate from "standard" steampunk clothing and still have it clearly recognizable as steampunk? Most notably, I wanted to avoid all the gears (you'll see how well that went...), and the corset and looped up skirt in women's clothing (nothing wrong with that, I just felt like doing something entirely different).

In the end, this was the result. Pictures from Gothenburg SteamCon, thanks to Karin for patiently photographing me with my mobile phone camera!


As you can see, in the end I added some gears anyway, on the bag and the hat. After all, I do like gears even if I think there can be too much of them, and I thought the costume needed a clear "this is steampunk" marker.

The bag has added pieces made of painted leather, and some "random shiny stuff" glued on.

I am only partly satisfied with the result. I liked a lot to wear this outfit, but as a garment, I feel that there is some work left to do on the gown. I used the pattern from The Tudor Tailor book, so I had to resize it from "standard men size" to "me size". I thought that would be very simple, as this is not exactly a fitted garment, but it was lot harder than expected. First I scaled it down before drawing the pattern, and then I made a test garment, but I still had to make the actual garment smaller as well. Especially the sleeves turned out way too big  - as large as my waist! Ridiculous. Shrinking them meant making the arm holes smaller on a almost finished garment, and then the over sleeves turned out too small instead, and... let's just say it took a while longer than expected, and the gown still does not hang really well. Also, I did not understand all the directions for sewing it that the The Tudor Tailor provided, so I had to make up as I went instead of just following directions.

From the pictures, it is clear that I need to make the sleeves shorter, and add some boning to the over (puff) sleeves to give them more puff and less hanging sadly.

I had been thinking that it would be nice to have something like a chain of office to wear with this, but I had not been able to find anything I liked, or any idea on what I wanted to make. In the Bazar at Gothenburg SteamCon, I was talking to Lykke Banck who has the shop Lucky Gears, and she offered to make one for me. She even finished it the same morning, so I could wear it at the convention! It might not be obvious from the picture (this picture is taken at the very end of the convention so I am quite tired at the time) but I am very happy with how the costume looked with the chain added! I just needed to fix it to the coat somehow, as it kept sliding off. 

Tired picture of gown with chain of office
Close up on my dress form.


The facts:
What is it? A steam punk outfit inspired by 16th century upper class men's clothing and 19th century men's clothing.

The pieces: Hat and gown made by me. Trousers bought from a second hand store. Shirt is a standard shirt, modified so that a bought collar could be attached instead. A black tie from husband's wardrobe. Bag is bought but heavily decorated by me. A clock chain used to hold gown together, and a cravat tie, both likely antique, that I got as gifts. Black modern men's shoes ("Olof, doesn't you need new shoes? I can take care of your old ones."). A medal.

Fabric of gown? Brown velvet from IKEA. Red polyester brocade, previously bought to be a women's 16th century dress. Red cotton for some parts of the lining.

Pattern: Hat and gown from the book The Tudor Tailor. 
Total cost: maybe 250 kr for the velvet, 50 kr for lining, and 200kr for the brocade. 170 kr for gears for the hat and bag. Total something like 670 kr, 67 EUR, 67 $. Also 300 kr for custom made chain of office.

Hours to complete? No idea. A lot longer than I thought, and so long that I was very tired of it in the end.
First worn? At the SteamCon steampunk convention in Gothenburg in November (my blog post of that here).

måndag 7 november 2016

Steampunk persona: Leonidas Tengbom, book collector

I was going to write about one of my new gowns, but something else came out, so instead in this post the Costuming Engineer proudly presents to you Leonidas Ylvar Tengbom, distinguished book collector and conservative steampunk gentleperson!

(I will use "ze" and "hir” as gender neutral pronouns.)

Leonidas Tengblom at the recent bazar in Göteborg, a bit tired after a day of searching for new book treasures.

Leonidas Tengbom lives in a large house in the part of Sweden that is called Bergslagen, where ze lives with hir husband and a pet squirrel called Flogiston (but ze would never admit how fond ze is of the pet - "It just happened to move in when I happened to feed it! I cannot help that Flogi prefer to sit on the armrest of my favourite armchair!") At home, ze prefers to spend most of hir time in hir library, researching odd historical topics or conserving old and fragile books, or taking long walks around the small lakes with hir husband. Hir favourite season is the autumn, and if there had been any people taking walks at the same paths as ze does, they would have seen hir stop frequently to enjoy the smell of moss, fallen leaves or a fir tree in the sun.

As the chairperson of the International Society for the Keeping of Old and Dusty Books, Leonidas Tengbom often get to travel, in search of book or for conferences and work groups. This ze does under much mumbling and grumbling, and always claiming that airships and zeppelins should be avoided (modern contraptions, cannot be trusted! and the steam submarines are even worse!) but for some reasons, ze often ends up with using them anyway, as they after all are a decent bit more comfortable than carriages. At the numerous meetings for other book collectors, keepers and researchers, ze transforms from the quiet reader to the outspoken and social chairperson and researcher for a few days, before going back home to enjoy the quite days at the countryside again.

Recent findings - notebooks from the Köping alchemy group
 
And finally - a word of advice. If you meet hir, do not ask about hir latest research project unless you are willing to spend quite a while listening! "Oh, currently I am researching the alchemical group that formed around Carl Willhelm Scheele in Köping a few years befor his death! How nice of you to ask! Not many people know that he became active in an alchemical group when he moved to Köping. With his brilliant mind, he soon become an important member, and the group seemed to make progress, but not for long. After a while he and the rest of the group split, over an heated argument about the moral of some of their experimental methods. That is why the group is not known today - without Scheele, the group did not make much progress. Scheele would not let the group publish the findings he had made with them. But, you know, he must have forgiven at least one of the members, because at his death bed, he married the group member Sara Pohl, in order for her to inherit his pharmacy. It seems he wanted her to be able to continue her alchemical work after all! I first found this mentioned in this book that I found when I ... "

Steampunk convention

As I write this, I am on my way home from SteamCon in Gothenburg. It has been three very very nice days, and now I am happy and tired and a little bit sad that I have to go back to reality. (I know, I English was my first language, or just if I was less tired, I should be able to come up with some more varied and precise adjectives. As it is, I will just write lots of "nice" and "amazing" in this post, so now you are duly warned!) 
I found a "box backpack" friend! So here you get a sneak peek of my ghost detection box. Also, look at her amazing haircut! Almost make me want to cut off my hair too.

The convention had a number of different workshops and discussions/lectures. I have made false metal mini book covers, a small chemical "volcano", and hair jewellery. But what I liked most was to talk to all nice (I warned you!) and interesting people. One day, I and my friend Karin just grabbed some random people who looked nice and asked if they wanted to have "fika"  (coffee and sweets) with us. They said yes, and I greatly enjoyed our discussions (for example, why is there so much brown and orange in steampunk? And are there sub-sub-cultures in English steampunk?). Steampunks are so nice and generous people! And it is fun that there is a nice mix of ages.

Of course, it was also very fun to look at people's clothing and accessories. So many different takes on steampunk! And as I am embarrassingly fond of being photographed in my steampunk and historical garb, I also greatly enjoyed wearing both my two new outfits ("the ghost detection box" and the "conservative steampunk gentleperson goes 16th century"), and my old favourite, the 1886 uniform dress. I will post about those later.

Here comes pictures of some of all the nice looking people I met. Of course, I forgot to take many of the pictures I wanted, so this is just a small selection.

My friend Karin as the mechanic, showing a fellow mechanic some intricate detail of the adjustable wrench (skiftnyckel in Swedish). Karin won first price in "best composition" costume contest category - congratulations, well earned!


There were a number of well clad gentlemen.

Marianne, in her archaeologist persona, looking great both in day wear and evening wear.


These two won first price in the craftmanship category of the costume competition. They had amazing level of detail, especially on the weapons. Hard to see in this picture, but his arrow tip is a flask of green liquid, with light in it!


This was all photos I remembered to take. Next posts will also be steampunk - they will be on my ghost detector box, and about my 16th/19th century cross over outfit.

torsdag 20 oktober 2016

1876 dress photo session

I May, I posted about my 1876 afternoon dress. Since then, I have made a hat to wear with it, and made another photo shot. Since I am so happy about how the pictures turned out, here they are - the 1876 dress, now decently worn with hat and gloves! The pictures are taken at Lambohovs Säteri, just a kilometre from were I live.


I also got some less dignified pictures - this is what it looks like when you bike to the location (wearing chemise and corset under normal trousers and jacket, and a flimsy hat instead of a biking helmet) and then dress on the spot... :-)
"How do I put on this mess of a skirt?"


"Without dignity! Probably shouldn't have put the hat on first..."

As always, thanks to Olof for photographing!

måndag 15 augusti 2016

Star Trek Voyager Uniform


This summer have been much hiking and biking (including a very nice trip to the Swedish "High Coast", Höga kusten), and not so much sewing. I have made one project thou: something I have wanted for a long time, namely an uniform from Star Trek Voyager. I have watched the 7 seasons twice, and am a huge fan of Captain Janeway. (I also like the cybernetic, hive-mid Borg of the series a lot, but cosplaying them would be a significantly larger challenge! )
Photo by Iza Palm
The uniform is made from a black jumpsuit which I already had, which I picked apart and remade. Just getting rid of the pockets took several hours, as they were very sturdily attached ( it was a work-wear overall, after all, not a cosy lying-in-the-sofa Onesie/Onepiece...). The main changes was to make it a lot slimmer, and putting on the colored yoke. I removed the sleeves, shortened it at them waist, and then using my standard bodice patter for a template of how much smaller the bodice needed to be. Then I recut the sleeve holes and sleeves, put on the yoke on sleeves and bodice, and attached the sleeves again. All in all, I think re-modelling it took just as long as starting from scratch would have done, but it felt easier to start with something and just pin it in until it fit, rather than cutting toiles and trying. 


I also made a combadge from plastic which I cut and painted. For rank pips, my husband found perfect magnets, the right size and very strong. I also had to make a deviation from what they wear in the series: the uniform has no pockets, and they almost never wear bags, as the spaceship is so sofisticated that there is no need for money or keys. My world however requires me to keep keys and money and phone (that communication badge is still not working…), so I added a hip bag.

Photo by Iza Palm, cropped and lightened a bit to show more details.
I like the result, and compared to the 1880’s dresses which needs corset and bustle and underskirt, it almost feels like cheating to have a costume this comfortable. Now I just needs to make up more excuses to wear it! Also, I would like try my hands with make-up, and paint on Jadzia Dax' markings and cosplay her.
Dual fandoms - Star Trek and Doctor Who! Here you can see the added hip bag. 

The facts:
What is it? A uniform from the science fiction series Start Trek Voyager

Fabric? A remade jumpsuit of very sturdy cotton, and some polyester for the blue-green yoke.
Notions: Metallic zipper, a communicatior badge made from plastic, rank pips (strong magnets).

Pattern: I used my basic bodice pattern as a guide for the bodice. The pattern for the yoke is the same as I used for my Star Trek jacket.
How historically accurate screen accurate is it? It looks decent, but I have not cared whether the construction methods are the same as in the films, or not. My jumpsuit has a waist seem that is not in the series ones, and some seams in the back are different as well. Also, the "real" uniforms used wool twill, which would be almost impossible for me even to find, so I used cotton/polyester instead. I think the overall look is good thou.

Total cost: 8 Euro for the zipper and magnets, 10 Euro for the blue-green fabric (I only needed like 20 cm of the 1 m I bought, but the rest is probably not useful for anything else.)

Hours to complete? A guess is 10 h for the jumpsuit and almost 2 for the combadge and fiddling with rank pips.  
First worn? At the NärCon cosplay and game convention here in Linköping a few weeks ago.

How did I research this? Looking at pictuers, and reading the very good (but very long) costume analysis by a pattern company who apperarantly have done their homework well (found on this page).

lördag 28 maj 2016

1876 afternoon dress

I have not been posting much for a while, and the reason for that is that I have been busy hand sewing trim on the 1876 dress - not much to post about. But last Saturday I got a chance to use it my parents birthday party at a manor, so I increased speed a bit and managed to finish it in time - even one day ahead! Here is a post about the construction of the overskirt. There is not much to say about skirt and bodice construction, so here I will just post pictures of the result, taken at the beautiful Kohlswa Herrgård, a small manor close to where I grew up. Also I will give the facts about it as for HSM. 

As always, big thanks to Olof for patient and skill-full photographing! And please disregard that I am outside without hat and gloves - how improper of me!

Inside...


 And outside.


Close up of overskirt, back.


I just had to add some bows.

Crocheted trim with hand made tassels (I think I made about a hundred...)


With my parents. Yvonne wears her Gagnef, Dalecarlia, folk costume.


We also got a tour of the old orangery, which was remade into a suite, in a mixed modern/old-ish style. As decoration, I found an old book, which turned out to be from exactly the year my dress is pretending to be, 1876! It is a collection of magazines, with stories, travel reports, poems, and the like. Of course we had to take a picture of me reading something "contemporary".


I really like this dress! I feel elegant, and the train was not as annoying as I had imagined. (I still wouldn't wear this dress to any crowded event thou - even on this quiet event two people stepped on the train. We are obviously not used to there being trains on clothes nowadays...)

 HSM facts:

What is it?  1876 afternoon dress
The Challenge: no 5, Holes.
Why does it fit this challenge?  I admit to stretching it a bit here. There is a crocheted trim on the skirt, which is made in a lattice pattern, so there is holes, but they can hardly be said to be a prominent feature of this dress. The trim turned out to be more discreet than I would have preferred - I should have made it in a contrasting color, not the color of the fabric beneath.

There is also a "hole"  on the over skirt where the red fabric shows through - formed not by cutting but by the adjacent fabric pieces. I find that a interesting feature of this particular time period , how there are so many ways of making an over skirt.

What time is it? Will work for 1876-1879. It is typical for the transition between early bustle and natural form, with there being still some volume at the skirt in the back, but a slim front.
Fabric? Wool blend for skirt and bodice,  red polyester brocade upholstery fabrics for trim, small piece of cotton velvet for cuff, white cotton for neck and wrist "ruff".

Notions: metal buttons for cuffs. Hooks and eyes.


Pattern: Bodice is Truly Victorian Cuirass Bodice, modified to fit without a large bustle and with another neckline. Skirt is from Fashions of the Gilded Age. Overskirt draped by me. 

How historically accurate is it? Well, fabric should have been silk for a dress like this. For bodices closing at front like this one, buttons seems to have been used on the majority of garments at this time, not hooks and eyes like I used. I think the look is pretty good thou - the elements of trim (including the diagonal "sash" at the bodice) are taken from different fashion plates and combined.
The colour combination is not typical, but it existed. I have seen a few fashion plates with dark blue fabric and red trim, but it is not common. It seems to have been much more common to either use one base color and then a trim of a similar colour but lighter or darker shade (like dark and light blue), or a soft base color with a vibrant accent of another colour, like grey with red. I probably will do a separate post about the preferred colors of this time period later...

Total cost: something like 30-35 EUR. 

Hours to complete? A lot, I would guess 50+. The basic bodice and skirt would only have been a few hours each, but making and hand sewing on all the trim took a while. Just making all the tassels for the trim, and crocheting the trim, would have been 10+ hours. 

First worn? At my parents birthday celebration last Saturday. (no-one else was historically dressed, but I could not resist the chance to wear it at a festive occasion in a beautiful old manor.)

How did I research this? The skirt support has a post of its own. The dress: mainly by looking at fashion plates and photos of extant garments. I also found this post about the so called "parasol pockets" of 1875-1876, which most likely were just decorative. I will have to add a decorative pocket to my skirt sometime, I think.

Constructing the 1876 overskirt

As I started my 1876 dress, I was a bit baffled by the overskirts. They seemed so elaborate and they all looked quite different - how to start? As I started, it turned out to be not so difficult after all. Here is how my overskirt looked step by step as I added pieces to the overskirt. 
The finished dress will get a post of its own soon, with lots of pictures from photo session at Kohlswa Herrgård, a manor close to where I grew up.

Of course, the real process was way more messy than it looks here, with cutting toile pieces, and experimenting with both them and the actual pieces. This is the pieces I ended up using. 

The front overskirt is almost rectangular, with just small darts at waist.  

And for the back, three smaller pieces.
First, the not quite finished bodice and skirt, without any overskirt pieces.

With front overskirt added:

Added the blue back pieces: 


And with the red: 


I then decided it looked too flat and well ordered while the overskirts of the time seemed more draped and gathered. I tried to add some more gathers. Experimenting out at my dress form:

Finally, it ended up like this (a sneak peak from the photo session). I would have preferred it even more draped,  but the blue was too soft and the red too stiff, so this is what I ended up will. I am pretty satisfied anyway. (I just had to add some bows as well, and there might be even more bows added the next time I use it... )


lördag 23 april 2016

1930's pants

 In between all the 1870's sewing that I am doing right now, I made myself finish something that will be useful more often than a trained gown, namely a pair of 1930's trousers that I will wear at work. (After all, I had promised myself to make more everyday clothes this year - it felt too stupid to make a something like a fourth 1880's dress and then complain about having nothing to wear for all the days were "normal" clothing is required. ) I have been having trouble finding well fitting pants for a long time, so when I found this pattern that seemed like they would fit my large thigh to waist ratio, I was more than happy to try it.

There is not too much to say about researching and construction of these pants - I followed a pattern, they fit, I love them! They also fit into the Historical Sew Monthly challenge "gender bender". In the picture, I am experimenting with the sailor style that seems to have been popular at the time.


The facts:

What the item is: 1930's Pants

Fabric/Materials: A wool/synthetic blend (as I found out when it melted when I ironed it...)

Pattern: Wearing History's Smooth Sailing 1930's trousers

Year: late 1930's I think.

Notions: Zipper, snap, silver wire for throwing together a belt fastening until I can find a real one

How historically accurate is it? I think the pattern is well researched and I followed the instructions. However, the pattern states that the fit is a bit adapted to suit a modern taste - they are less baggy at the back side than they would have been at the time. Here is a good blog post by Wearing History about the look and fit of early women's pants. I have no idea what fabrics typically was worn, but at least grey wool feels reasonable. Minus for plastic zipper and weird belt fastening.

Hours to complete: 2 h taping the home-printed e-pattern (ouch). Maybe 5 h actually making them? Surprisingly, they fit at first try except for waist size, but I guess the VERY wide trouser legs helps, as I have thighs that are large compared to the size of the rest of me...

First worn: I have been wearing these several times at the office, and I really like them. It feels like they have a retro style without feeling like wearing a costume to work. And they are really comfortable!

Total cost: Something like 180 kr, 19 eur, 22 $.

torsdag 17 mars 2016

Early natural form skirt support - me-made

In my previous post, I wrote about my research of early natural form skirt supports.

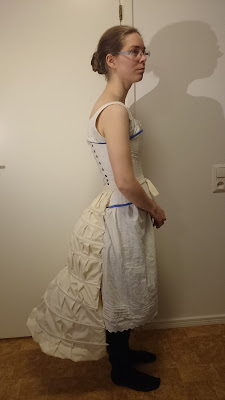
This is what I ended up making. I will not go into details of how I made them, but just show the result, and the HSM facts.

As mentioned in the earlier post, I based my bustle and petticoat on these ones:


I chose to make the gathering in the form of a drawstring, because I then can let them out and use the petticoat for bustle dress if I want. I think I have read something on how women would convert their bustle fashion petticoats to the later slimmer fashion by adding a drawstring like that, but I am not sure where I read it. I used the same pattern as I will use for the skirt - Skirt with train from Francis Grimbles Fashion of the Gilded Age (this book is a  fantastic collection of period patterns and texts on the natural form era, but as it starts 1877, it could not entirely help me with the transitional fashions of 1876.) My petticoat closely reassembles the one made by Lisha Vidler at Yesterday's Thimble, and she made a very good tutorial (which I did not follow due to laziness), so for details on how to make one properly, look at her tutorial.

The bustle is just made up, without any attempt at period correctness or even neatness. I just made channels, and experimented with the length of each bone until I got the shape I wanted. This is the result:

 Worn with this one underneath:
The Historical Sew Monthly Facts:
Challenge: Protection

What is it? Petticoat (and bustle) for the transition between early bustle and natural form.

Why is it protection? The train of the petticoat will protect the skirt train from dirt from the ground.

Year? 1876. Will work for other years by adjusting the width of the back with the drawstring.

Pattern? I used the Skirt with train from the book Fashion of the Gilded Age by Frances Grimble, and added drawstrings in the back panel to adjust width, and the flounce. For bustle - none, just made it up.

Fabric? Bedsheets, plain cotton for flounce, and mysteroius white fabric from stash for bustle


Notions: tapes, synthetic whalebone for bustle


Time? Maybe 5 h for petticoat, 4 h for bustle. Plus lots of hours to figure out which model of petticoat and bustle to use.

Cost? Bedsheets from linen cupboard. 80 kr for the flounce fabric.

How historically correct is it? Petticoat is based on a period pattern, and pictures from ads from the time, so the look and shape is ok. Construction methods are not- I did whatever I felt was easiest, as I had not much inspiration/energy left for making after all the researching. Also, I am sure that someone affluent enough to wear a long train like this would have had fancier fabric than this in her petticoat. And there seems to be lace on almost all petticoat flounces I have seen, but I skipped that for cost reasons. 

Bustle is decent in the resulting shape, but no attempts are made at using historically accurate materials or construction methods.

First worn: just for photos, yet.

I learned a lot in figuring out these ones - a fun challenge!